New Aircraft and Equipment
Overview
The New Aircraft and Equipment application enables users to create configuration-managed (CM) asset hierarchies from Model definitions.
This application streamlines the process of creating complex asset structures by leveraging the engineering data defined in the Model application, ensuring consistency and accuracy in asset creation.
Asset Assembly Types:
The New Aircraft and Equipment application supports two primary types of asset assembly creation:
-
Complete Asset Assembly - An entire assembly starting with an end-item as the top-level asset within the assembly
- Examples: Complete aircraft, engine or other complex equipment which exists as a Model.
- Creates the full hierarchy from top-level asset down to all sub-components
- Ideal for new aircraft deliveries
-
Partial Asset Assembly - A sub-assembly where the top-level asset corresponds to a position in the Model's build hierarchy at a level of indenture greater than 1
- Examples: Landing gear assembly, APU etc
- Creates only a portion of the complete asset hierarchy
- Useful for creating spare rotable assemblies or replacement components
The New Aircraft and Equipment application uses the Model as a template to generate asset data, ensuring that created assets conform to the as-designed configuration and include all required components, meters, and relationships.
Key Capabilities:
- Generate complete or partial asset hierarchies from Model definitions
- Automatically create sub-assembly records based on build hierarchy
- Configure asset numbering schemes with prefixes and suffixes
- Define serial number patterns for components
- Convert existing non-CM assets to CM-managed assets
- Support bulk data loading via Maximo Integration Framework (MIF)
- Validate rotating items before asset creation
- Create assets in inventory locations (storerooms)
- Support background processing for large asset hierarchies
Integration Points:
- Model Application - Source of build hierarchy and configuration rules
- Part Number Master - Defines Part Numbers and their attributes
- Master Task Cards - Linked to Part Numbers for PM generation
- Aicraft and Equipment Applications - Used to manage and view as-maintained Aicraft and Equipment.
- BDI (Build Data Interpreter) - Validates created Aicraft and Equipment assemblies
Application Usage
The New Aircraft and Equipment application allows for a structured process that guides users through the process of defining, configuring, and creating asset hierarchies.
Step-by-Step Workflow
1. Create a New Record
Begin by creating a new New Aircraft and Equipment record:
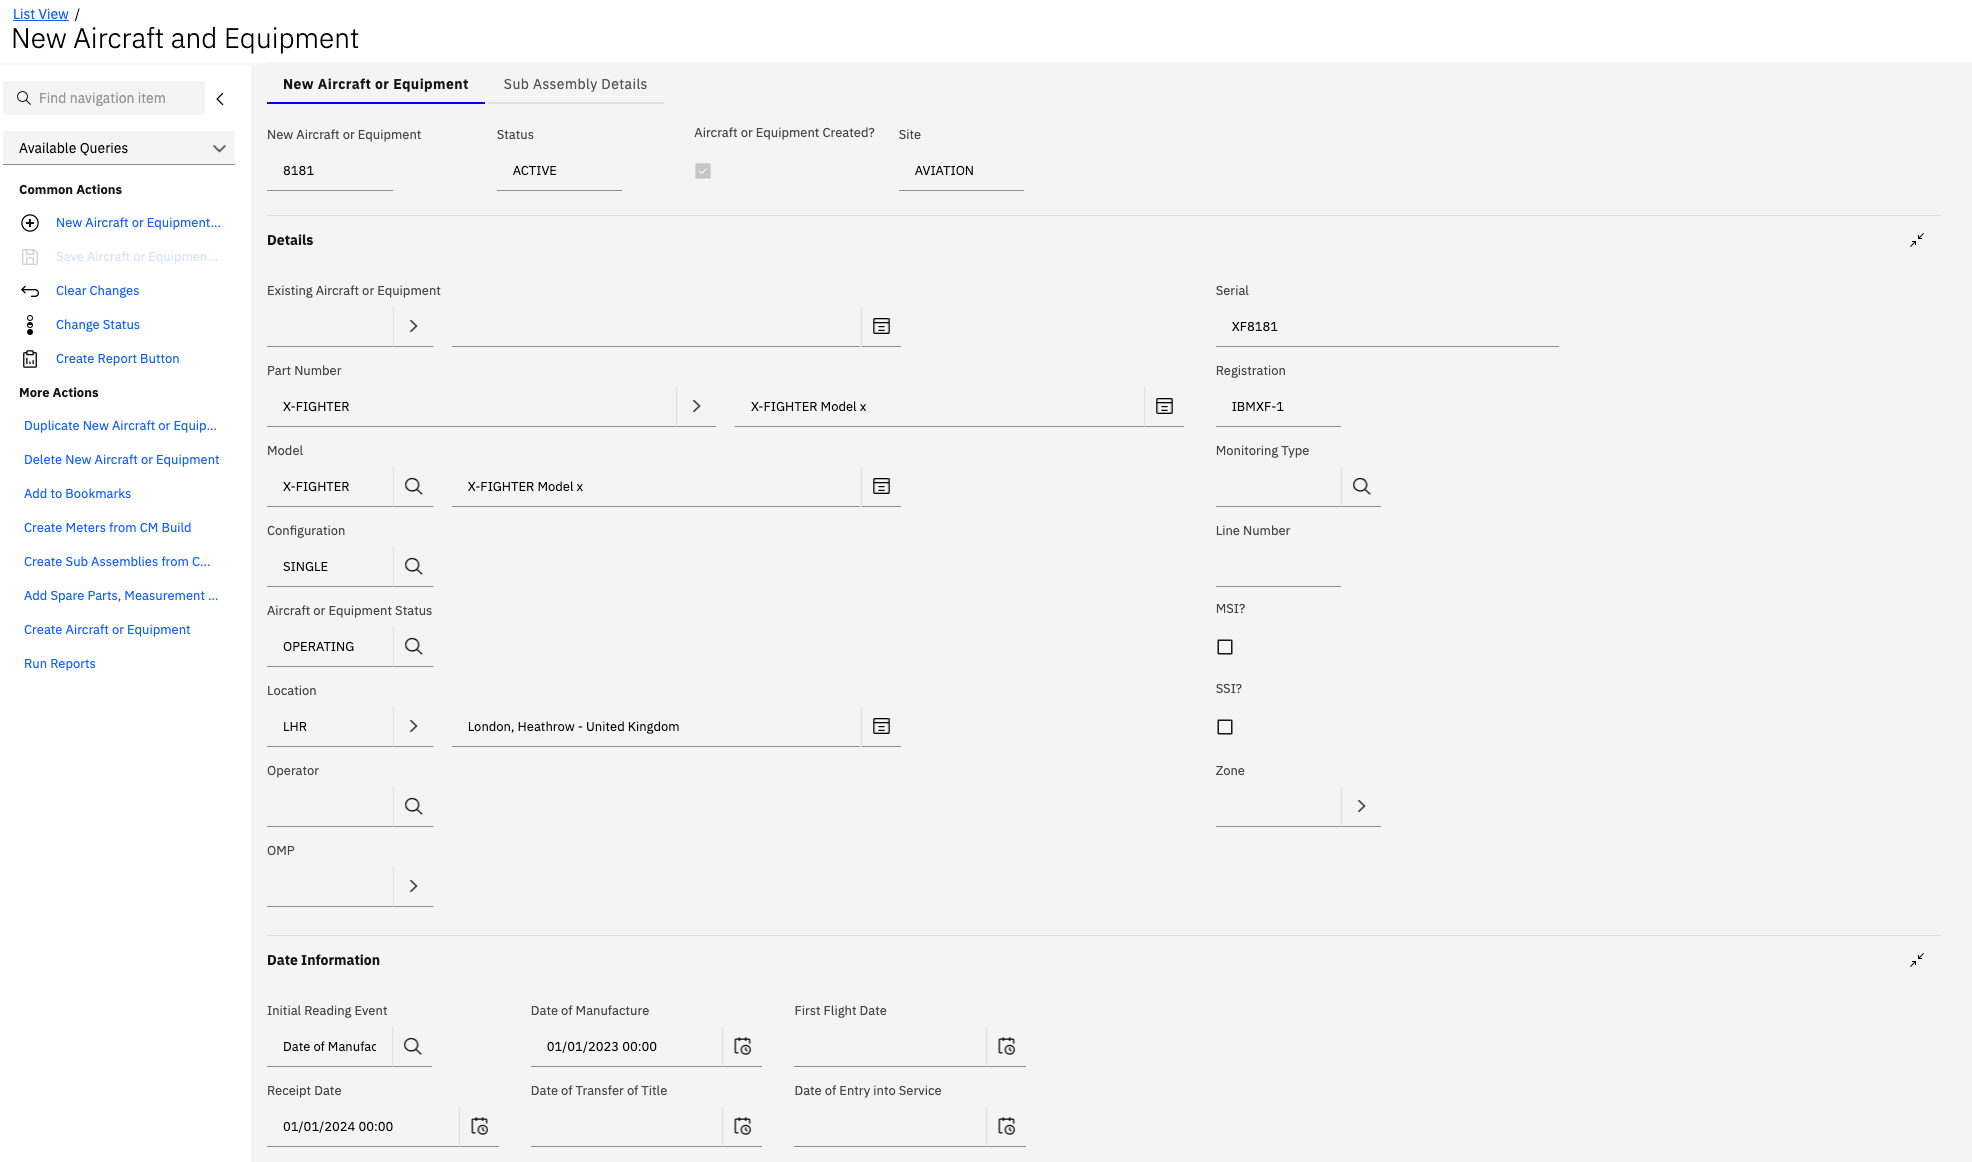
- Navigate to the New Aircraft and Equipment application
- Click New Aircraft or Equipment or use the + button
- Enter a New Asset value that will be used as the Asset number of the top-level asset
- Alternatively, configure the field (PLUSANEWASSET.ASSETNUM) to use the standard Asset autokey (see configuration section below)
2. Specify the Part Number
Enter or select the Part Number corresponding to the top-level asset of the new assembly
3. Select Model and Configuration
Choose the specific configuration:
- Use the lookup on either the Model or Configuration field
- The lookup presents all applicable values for the selected Part Number including:
- Model
- Variant
- Position (if creating a partial assembly)
- If creating a partial asset assembly where the Part Number is used in multiple positions, select the record with the specific position corresponding to the assembly you wish to create
Selecting the correct Model, Variant, and Position combination is critical as it determines the entire build hierarchy that will be generated. Verify your selection before proceeding.
4. Enter Required Information
Complete the essential asset details:
| Field | Description | Required | Example |
|---|---|---|---|
| Serial | Manufacturer serial number | Yes | XF8181 |
| Registration | Aircraft registration or tail number | Depends on "Registration Requied?" checkbox in the associated Model | IBMXF-1 |
| Asset Status | Initial status of the asset | Yes | OPERATING |
5. Specify Location
Define where the asset will be located:
- Enter a Location for the asset
- If an Inventory Location (storeroom) is specified, the asset will be added into the storeroom on creation
- This is useful for creating spare rotable assemblies that will be held in inventory
- For operational aircraft, specify the operating location (e.g., airport, maintenance base)
6. Define Date Information
Set critical dates for the asset:
| Date Field | Description | Importance |
|---|---|---|
| Receipt Date | Date asset was received | Transactions cannot be performed before this date |
| Date of Manufacture | Date asset was manufactured | Earliest allowable transaction date if before Receipt Date |
| First Flight Date | Date of first flight (aircraft only) | Used for warranty and aging calculations |
| Date of Transfer of Title | Ownership transfer date | Legal and financial tracking |
| Date of Entry into Service | Date asset entered operational service | Warranty and maintenance program start date |
Transactions such as installation and removal of child assets cannot be performed with an "As of Date" that is before the Receipt Date or Date of Manufacture (whichever is the earliest date). Plan these dates carefully.
7. Configure Sub Assembly Prefixes
Define how child asset numbers will be generated:
- Enter Equipment Prefix - Text to prepend to child asset numbers
- Enter Equipment Suffix - Starting number for sequential numbering
- The Asset Prefix and Suffix values are concatenated to form the asset number of each sub-assembly asset
Example:
- Equipment Prefix:
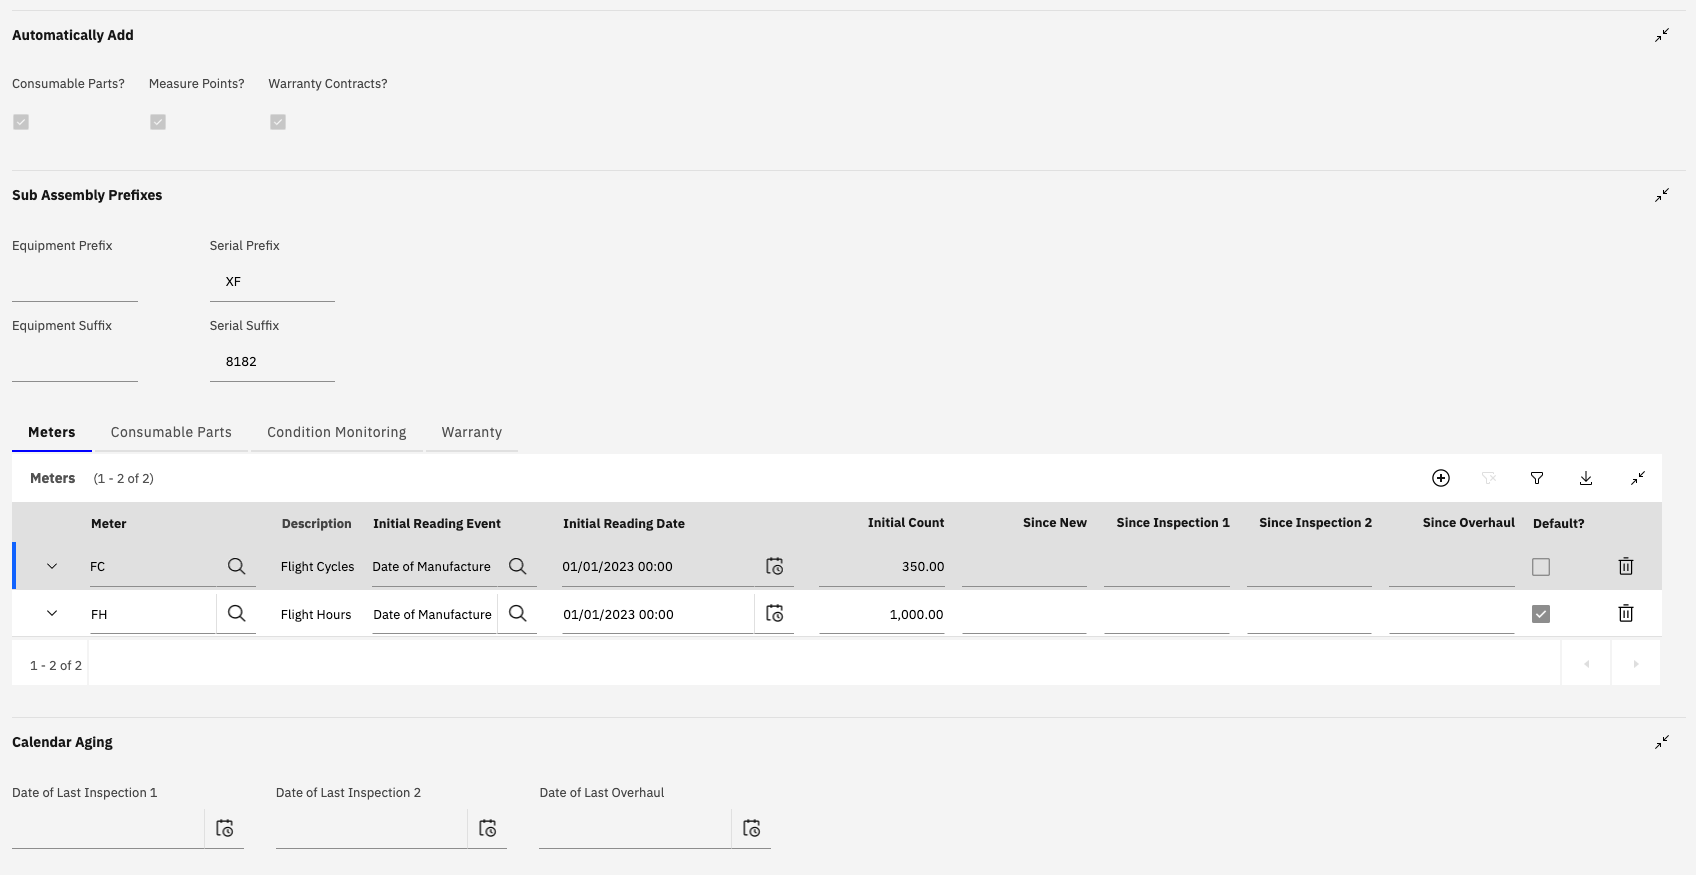
XF001- - Equipment Suffix:
001 - Generated child asset numbers:
XF001-001,XF001-002,XF001-003, etc.
This approach is particularly useful when creating demo or test asset assemblies where systematic numbering is desired.
Child asset numbers (PLUSANEWSUB.ASSETNUM) can also be configured to use the standard Asset autokey instead of the prefix/suffix approach. See the configuration section for details.
8. Configure Serial Number Generation
Define how child serial numbers will be generated:
- Enter Serial Prefix - Text to prepend to child serial numbers
- Enter Serial Suffix - Starting number for sequential numbering
- The same concatenation logic is used to generate serial numbers for child assets as for asset numbers
Example:
- Serial Prefix:
XF - Serial Suffix:
8182 - Generated child serial numbers:
XF8182,XF8183,XF8184, etc.
9. Add Meters
Define meters to track asset usage and life:
- Navigate to the Meters tab
- Click Add Row to manually add meters
- Alternatively, use the Create Meters from CM Build action to automatically add meters
Create Meters from CM Build Action:
- Analyzes all Master Task Cards linked to the specified Part Number
- Identifies meters used in the Meter Frequency of these related Master Task Cards
- Automatically adds these meters to the Meters table of the New Aircraft and Equipment record
- Ensures consistency between maintenance requirements and meter tracking
Meter Configuration:
| Field | Description | Example |
|---|---|---|
| Meter | Meter code | FC (Flight Cycles), FH (Flight Hours) |
| Description | Meter description | Flight Cycles, Flight Hours |
| Initial Reading Event | Event that establishes initial reading | Date of Manufacture, Date of Installation |
| Initial Reading Date | Date of initial reading | 01/01/2023 |
| Initial Count | Starting meter value | 350.00 (FC), 1,000.00 (FH) |
| Default? | Whether this is the default meter | Checked by default for the Primary Meter |
By default, meters added to the New Aircraft and Equipment record are automatically added to all child assets within the assembly, ensuring consistent meter tracking across the entire asset hierarchy.
Meters can also be automatically added to the asset records generated by assigning a Meter Group to the individual Part Number Master records. It is not possible to specify initial counts when using this mechanism so it may be necessary to update these to actual values after the asset assembly is created.
10. Generate Sub Assemblies
Create the sub-assembly structure:
- Click the Create Sub Assemblies from CM Build action
- The system generates sub-assembly information based on:
- Selected Part Number
- Selected Model
- Selected Variant
- Selected Position (if applicable)
- Related Model data and build hierarchy
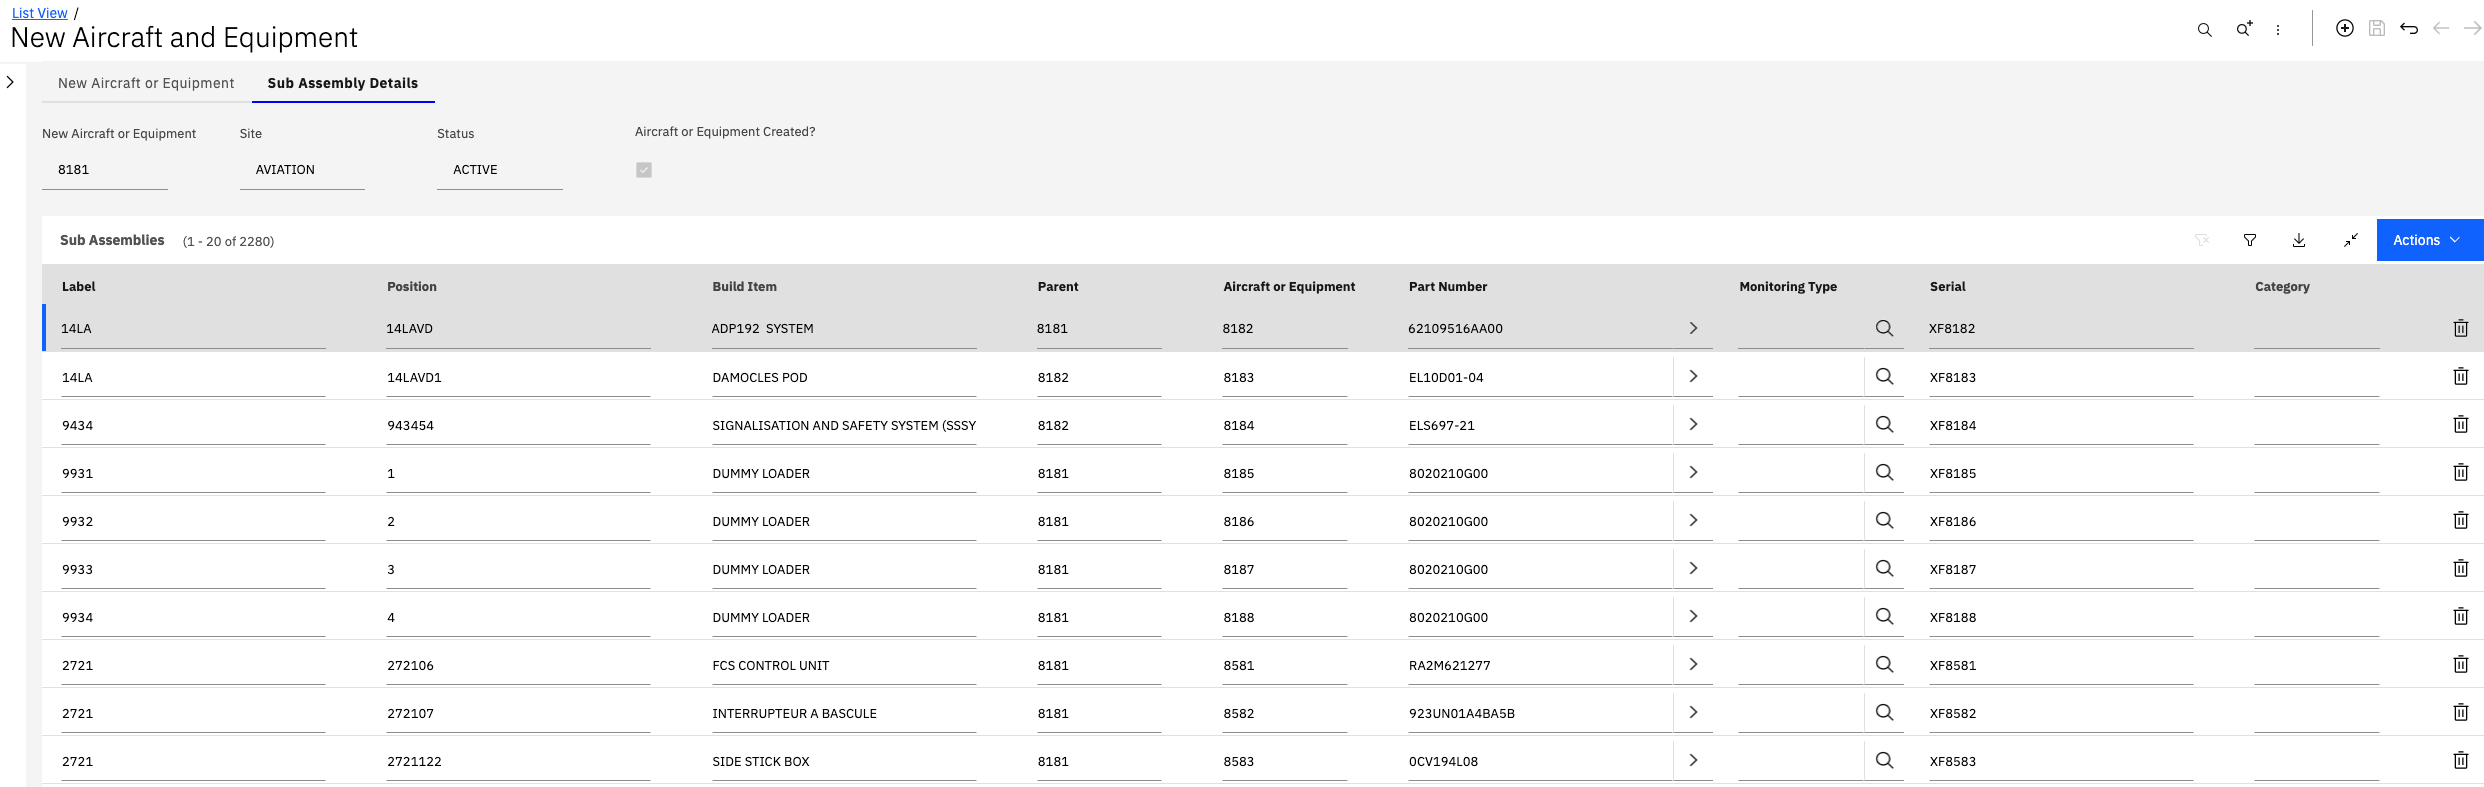
This action creates records in the Sub Assembly Details table representing each component in the build hierarchy.
11. Review Sub Assembly Details
Verify the generated sub-assembly information:
- Navigate to the Sub Assembly Details tab
- Review each sub-assembly record for accuracy
- Verify the following information:
| Column | Description | Verify |
|---|---|---|
| Label | Build hierarchy label | Matches Model definition |
| Position | Position code in build hierarchy | Correct position assignment |
| Build Item | CM Item part number | Correct part number |
| Parent | Parent asset number | Correct parent-child relationship |
| Aircraft or Equipment | Generated asset number | Follows numbering scheme |
| Part Number | Component part number | Matches build hierarchy |
| Monitoring Type | Condition monitoring type | Appropriate for component |
| Serial | Generated or assigned serial number | Unique and follows pattern |
| Category | Asset category | Correct classification |
The Part Numbers and Serial Numbers of the generated sub-assemblies can also be updated using the Maximo Integration Framework. This is recommended to avoid manually entering large amounts of data (which is prone to error).
Sub Assembly Details Tabs:
The Sub Assembly Details section includes multiple tabs for additional configuration:
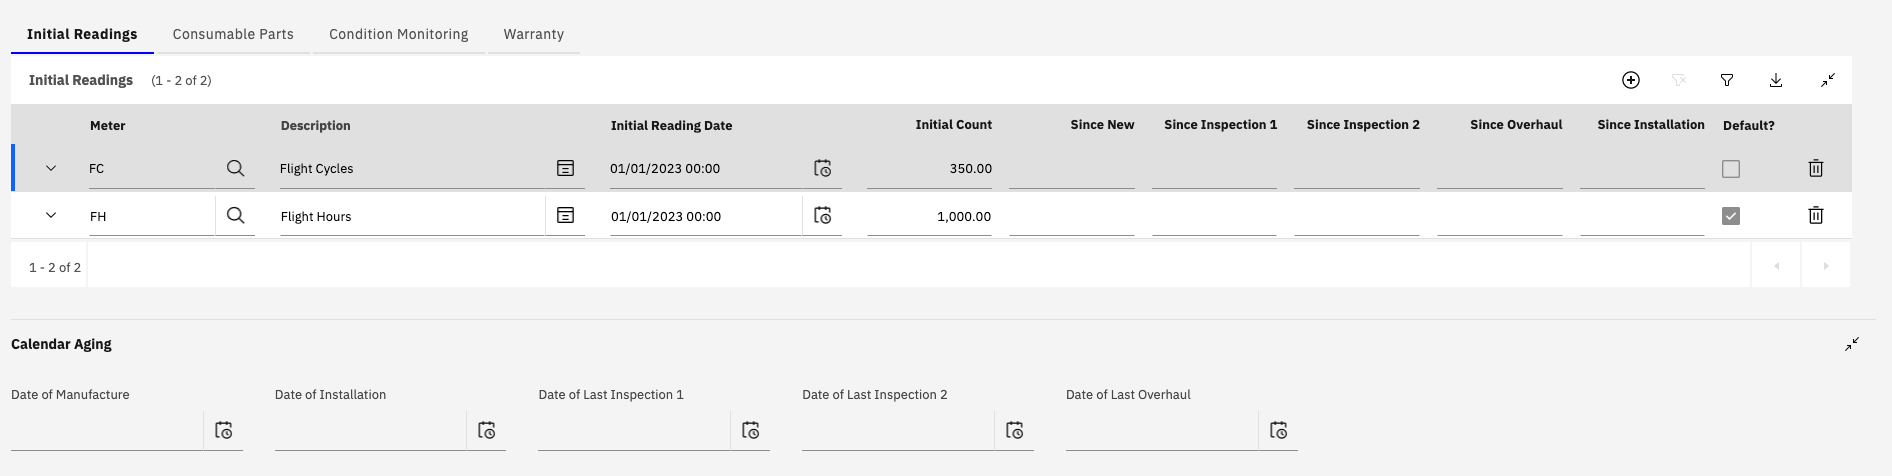
- Initial Readings - Configure initial meter readings for each sub-assembly
- Consumable Parts - Define consumable parts associated with sub-assemblies
- Condition Monitoring - Set up condition monitoring points
- Warranty - Configure warranty information for components
12. Activate the Record
Prepare for asset creation:
- Review all information for accuracy and completeness
- Change the status of the New Aircraft and Equipment record to ACTIVE
- This status change indicates that the data has been verified and is ready for asset creation
- Only ACTIVE records can be used to create assets
Once the status is changed to ACTIVE and assets are created, modifications to the record become restricted. Ensure all data is correct before activation.
13. Create Aircraft and Equipment
Execute the asset creation process:
- Click the Create Aicraft or Equipment action to initiate creation of the asset hierarchy
- Choose whether to run the process in the foreground or background:
- Foreground - Process runs immediately, user waits for completion
- Background - Process runs asynchronously, user receives email notification on completion
Background Processing:
- Recommended for large asset hierarchies (e.g., complete aircraft with thousands of components)
- Prevents timeout issues for long-running processes
- Allows user to continue working while assets are created
- Email notification includes success/failure status and any error messages
Pre-Creation Validation: Before asset creation begins, the system performs validation:
- Verifies that all Rotating Items linked to the asset or its children are valid within the target Organization
- Checks for duplicate asset numbers
- Validates that all required fields are populated
- Confirms that Part Numbers exist and are active within the target Organization
- Ensures parent-child relationships are valid
Asset Creation Process:
- Creates the top-level asset record
- Creates all child asset records in hierarchical order
- Establishes parent-child relationships
- Adds meters to all assets
- Sets initial meter readings
- Creates asset specifications
- Links to rotating items (if applicable)
- Triggers BDI validation (if configured)
- Generates Task Card records (via BDI)
Automatically Add Features
The New Aircraft and Equipment application includes options to automatically add related data to created assets, streamlining the asset creation process and ensuring completeness.
Available Options:
| Option | Description | When to Use |
|---|---|---|
| Consumable Parts? | Automatically add consumable parts to assets | When assets require specific consumables for maintenance |
| Measure Points? | Automatically add condition monitoring measurement points | For assets with condition monitoring programs |
| Warranty Contracts? | Automatically add warranty contract information | For new assets under manufacturer warranty |
Configuration:
- Check the appropriate boxes in the "Automatically Add" section
- Configure the specific items to add in the respective tabs:
- Consumable Parts tab - Define consumable parts and quantities
- Condition Monitoring tab - Define measurement points and parameters
- Warranty tab - Define warranty contracts and coverage
Benefits:
- Ensures consistency across all created assets
- Reduces manual data entry after asset creation
- Maintains compliance with maintenance programs
- Supports warranty tracking from asset creation
Using the Asset Autokey to Generate Asset Numbers
For organizations that prefer to use Maximo's standard autokey functionality for asset numbering rather than manual entry or prefix/suffix patterns, the New Aircraft and Equipment application can be configured to automatically generate asset numbers.
Configuration Requirements:
To enable autokey generation for asset numbers, direct database updates must be performed. This configuration should be done during initial system setup or during a planned maintenance window.
SQL Configuration Script:
-- Configure autokey for top-level assets (PLUSANEWASSET)
UPDATE maxattribute
SET autokeyname='ASSETNUM', canautonum=1, defaultvalue='&AUTOKEY&'
WHERE objectname='PLUSANEWASSET' AND attributename='ASSETNUM';

UPDATE maxattributecfg
SET autokeyname='ASSETNUM', canautonum=1, defaultvalue='&AUTOKEY&'
WHERE objectname='PLUSANEWASSET' AND attributename='ASSETNUM';

-- Configure autokey for sub-assembly assets (PLUSANEWSUB)
UPDATE maxattribute
SET autokeyname='ASSETNUM', canautonum=1, defaultvalue='&AUTOKEY&'
WHERE objectname='PLUSANEWSUB' AND attributename='ASSETNUM';

UPDATE maxattributecfg
SET autokeyname='ASSETNUM', canautonum=1, defaultvalue='&AUTOKEY&'
WHERE objectname='PLUSANEWSUB' AND attributename='ASSETNUM';
Converting Existing Assets into CM Managed Assets
The New Aircraft and Equipment application provides powerful functionality to convert existing non-configuration-managed assets into CM-managed assets. This capability is essential during system implementation when migrating legacy asset data or when adopting configuration management for existing assets.
Conversion Overview:
The conversion process updates existing non-CM asset records with the information necessary for the system to treat them as CM-managed assets, including:
- Setting the CM Part Number on the ASSET record and creating additional CM related data.
- Establishing Model and Variant associations
- Defining parent-child relationships based on build hierarchy
- Adding required meters
Conversion Workflow:
1. Prepare the Record
- Create a new New Aircraft and Equipment record as described in the standard workflow
- Critical Step: Populate the Existing Asset field with the existing non-CM managed asset number
- This field tells the system to update an existing asset rather than create a new one
2. Configure Top-Level Asset
- Specify the CM Item, Model, and Variant for the existing asset
- Enter the serial number and other identifying information
- Ensure the configuration matches the actual physical asset
3. Generate Sub Assemblies
- Use the Create Sub Assemblies from CM Build action
- The system generates the expected sub-assembly structure based on the Model
4. Map Existing Assets to Positions
This is the critical step that maps existing assets to their positions in the build hierarchy:
- Review each generated sub-assembly record
- Update the Aircraft or Equipment field on each sub-assembly record to specify the existing non-CM managed asset number that corresponds to that position
- This mapping tells the system which existing asset should be placed in each position
Example Mapping:
| Position | Build Item | Generated Asset | Existing Asset to Map |
|---|---|---|---|
| 1 | ENGINE-LEFT | RTMT001-001 | ENG-12345 (existing) |
| 2 | ENGINE-RIGHT | RTMT001-002 | ENG-67890 (existing) |
| 14LAVD | AVIONICS-POD | RTMT001-003 | AVI-11111 (existing) |
5. Execute Conversion
- Use the Create Asset action
- The system presents a dialog listing each existing asset record
- The dialog asks the user to confirm the update to these existing asset records
- Review the list carefully to ensure correct assets are being converted
- Confirm to proceed with the conversion
Conversion Process Details:
When the conversion is executed, the system performs the following updates to each existing asset:
Asset Record Updates:
| Field | Update Action |
|---|---|
| CM Item | Set to the part number from the build hierarchy |
| Model | Set to the selected Model |
| Variant | Set to the selected Variant |
| Parent | Updated to match the build hierarchy (if asset has no parent) |
| Position | Set based on position in build hierarchy |
| Configuration-Managed Flag | Set to true |
| Build Hierarchy Attributes | Populated from Model definition |
Meter Management:
- Meters defined in the New Aircraft and Equipment record are added to existing assets if they don't already exist
- Existing meters are preserved and not duplicated
- Initial readings are set for newly added meters
- Existing meter readings are retained
Parent-Child Relationships:
- If the asset does not have a parent, its parent is updated to correspond to its position within the build hierarchy of the Model
- Existing parent-child relationships are preserved if they match the build hierarchy
- Conflicts between existing relationships and build hierarchy are flagged for review
Conversion Validation:
Before and during conversion, the system validates:
- Existing assets exist and are accessible
- No duplicate asset numbers in the mapping
- CM Items are valid and configuration-managed
- Model and Variant are properly defined
- Parent-child relationships are valid
- Meters are properly configured
The conversion process makes permanent changes to existing asset records. Always test the conversion process in a non-production environment first and ensure you have a database backup before proceeding.
Best Practices for Conversion:
-
Data Preparation
- Audit existing assets before conversion
- Document current asset hierarchy
- Identify any data quality issues
- Clean up asset data before conversion
-
Mapping Strategy
- Create a mapping document showing existing assets to positions
- Verify serial numbers match physical assets
- Confirm parent-child relationships
- Review with operations and maintenance teams
-
Phased Approach
- Convert assets in phases (e.g., by aircraft, by system)
- Start with a pilot conversion of one asset
- Validate results before proceeding with bulk conversion
- Monitor BDI validation and PM generation after conversion
-
Testing
- Test conversion in development environment first
- Verify all asset attributes are correctly updated
- Confirm meters are properly added
- Test PM generation after conversion
- Validate reporting and queries work with converted assets
-
Communication
- Notify users before conversion
- Explain changes to asset records
- Provide training on CM-managed asset features
- Document the conversion process and results
Post-Conversion Activities:
After conversion, perform these activities:
- Run BDI validation on converted assets
- Verify Task Card generation is working correctly
- Review asset hierarchy in Aicraft or Equipment application
- Validate meter readings and history
- Test work order creation and completion
- Update documentation and training materials
- Monitor for any issues or anomalies
Bulk Data Loading with MIF
The New Aircraft and Equipment application supports bulk data creation and updates through the Maximo Integration Framework (MIF), enabling efficient processing of large volumes of asset data.
MIF Integration Benefits:
- Bulk creation of New Aircraft and Equipment records
- Mass update of serial numbers, CM Items, and meter information
- Automated data loading from external systems
- Integration with legacy system migrations
- Support for data validation before asset creation
MXLoader Support:
An example MXLoader file is provided in the Loading Data topic that demonstrates:
- Creating New Aircraft and Equipment records via MIF
- Updating sub-assembly information
- Setting meter configurations
- Preparing data for asset creation
Typical MIF Use Cases:
-
Initial System Load
- Load fleet data during implementation
- Create New Aircraft and Equipment records for all aircraft
- Populate sub-assembly information
- Set initial meter readings
-
Bulk Updates
- Update serial numbers for multiple assets
- Change CM Items across multiple records
- Modify meter configurations
- Update date information
-
Integration with External Systems
- Import data from ERP systems
- Sync with manufacturer databases
- Load data from spreadsheets
- Integrate with procurement systems
Using MIF for bulk data loading is particularly useful when creating multiple similar assets (e.g., a fleet of identical aircraft) or when migrating data from legacy systems.
Adding Spare Parts, Condition Monitoring Points and Warranty
The New Aircraft and Equipment application provides tabs for configuring additional asset-related information that will be automatically added to created assets.
Consumable Parts
Define consumable parts that are associated with the asset:
- Navigate to the Consumable Parts tab
- Add consumable items that are regularly used with the asset
- Specify quantities and units of measure
- These parts will be automatically linked to created Aircraft and Equipment records
Use Cases:
- Lubricants and fluids specific to the asset
- Filters and consumables for maintenance
- Standard hardware and fasteners
- Cleaning and preservation materials
Condition Monitoring
Configure condition monitoring measurement points:
- Navigate to the Condition Monitoring tab
- Define measurement points for the asset
- Specify monitoring parameters and thresholds
- Set up monitoring schedules
Monitoring Types:
- Vibration analysis points
- Temperature monitoring locations
- Pressure measurement points
- Oil analysis sampling points
- Performance parameter monitoring
Warranty
Set up warranty information for new assets:
- Navigate to the Warranty tab
- Define warranty contracts
- Specify coverage periods and terms
- Link to warranty providers
- Set up warranty tracking parameters
Warranty Information:
- Warranty start and end dates
- Coverage scope and limitations
- Warranty provider contact information
- Claim procedures and requirements
- Parts and labor coverage details
Configuring these additional elements ensures that created assets have complete information for maintenance planning, condition monitoring, and warranty management from day one.